
外出先でも自宅と同じWEBブラウザを使用する方法や自宅と同じウェブブラウザを外出先でも使用する方法で、ウェブブラウザをUSBメモリにインストールして外出先でもいつも使っているブラウザを使用できると紹介してきましたが、今回は「メールアプリ」をUSBメモリに入れて持ち運ぶ方法を紹介したいと思います。
メールアプリをUSBメモリに入れて持ち運べるようにすれば、ホテルやネットカフェ等の外出先でメールを確認したい時に、別のパソコンでログインしたり、メールを送受信する必要がなくなり、個人情報やビジネスデータの流出を防ぐことができます。
今回は「Thunderbird Portable」という外部接続で起動できるメールアプリを紹介していきます。
Warning: include(/home/w-clue/howto-recordingmedia.com/public_html/wp-content/themes/cocoon-master/inc/single_top_ad.php): Failed to open stream: No such file or directory in /home/w-clue/howto-recordingmedia.com/public_html/wp-content/themes/cocoon-child-master/functions.php on line 15
Warning: include(): Failed opening '/home/w-clue/howto-recordingmedia.com/public_html/wp-content/themes/cocoon-master/inc/single_top_ad.php' for inclusion (include_path='.:/opt/php-8.1.34/data/pear') in /home/w-clue/howto-recordingmedia.com/public_html/wp-content/themes/cocoon-child-master/functions.php on line 15
1.Thunderbird Portableを導入する
Thunderbird PortableをUSBメモリに導入して使用する方法は外出先でも自宅と同じWEBブラウザを使用する方法と似ているので簡単にダウンロード&インストールが出来ます。
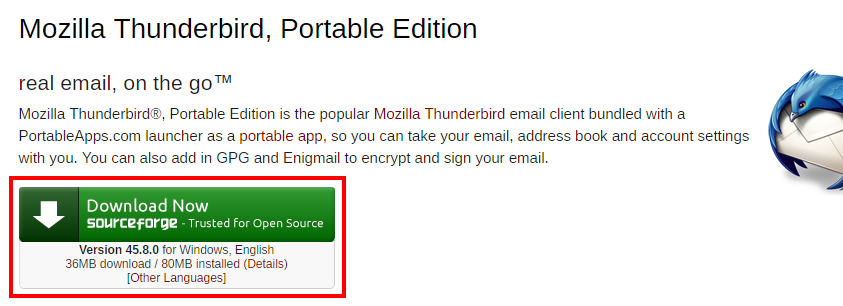
まずは、Thunderbird Portableにアクセスし、赤枠の「Download Now」をクリックしてThunderbird Portableのダウンロードを開始しましょう。
USBメモリにメールアプリを導入して持ち運ぶ方法1
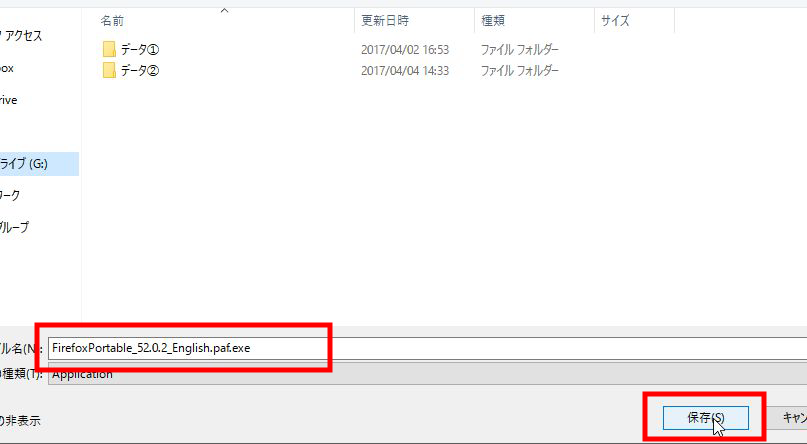
ダウンロード先はThunderbird PortableをインストールしたいUSBメモリを指定しておきます。
USBメモリにメールアプリを導入して持ち運ぶ方法2
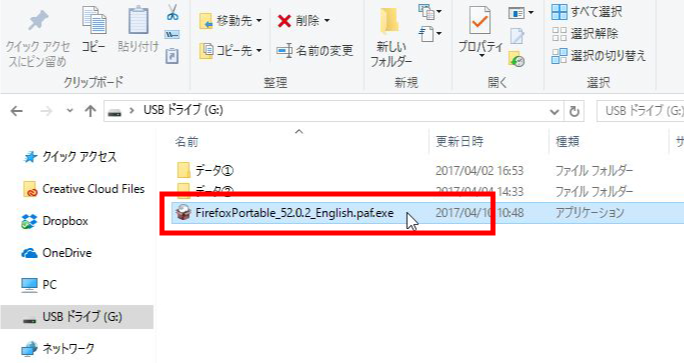
ダウンロードが完了すればさっそくインストールしていきましょう。ダウンロードしばUSBメモリにアクセスし「exeファイル」をダブルクリックします。
USBメモリにメールアプリを導入して持ち運ぶ方法3
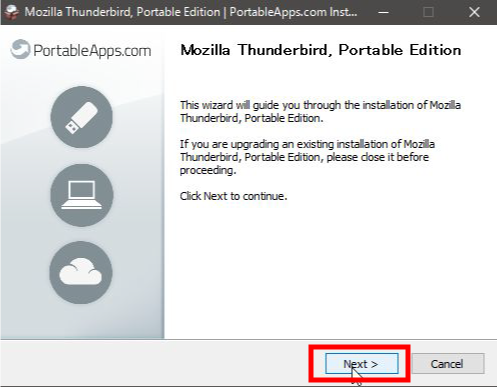
するとThunderbird Portableをインストールしますか?と表示されるので「NEXT」を押してインストールを開始します。
USBメモリにメールアプリを導入して持ち運ぶ方法4
Warning: include(/home/w-clue/howto-recordingmedia.com/public_html/wp-content/themes/cocoon-master/inc/single_middle_ad.php): Failed to open stream: No such file or directory in /home/w-clue/howto-recordingmedia.com/public_html/wp-content/themes/cocoon-child-master/functions.php on line 15
Warning: include(): Failed opening '/home/w-clue/howto-recordingmedia.com/public_html/wp-content/themes/cocoon-master/inc/single_middle_ad.php' for inclusion (include_path='.:/opt/php-8.1.34/data/pear') in /home/w-clue/howto-recordingmedia.com/public_html/wp-content/themes/cocoon-child-master/functions.php on line 15
次にインストール先の場所を指定してくださいと表示されますので、インストールしたいUSBメモリを指定しましょう。exeファイルをUSBメモリにダウンロードしておけば、初期値でUSBメモリになっているとはずなので、そのまま「Install」を押して問題ありません。
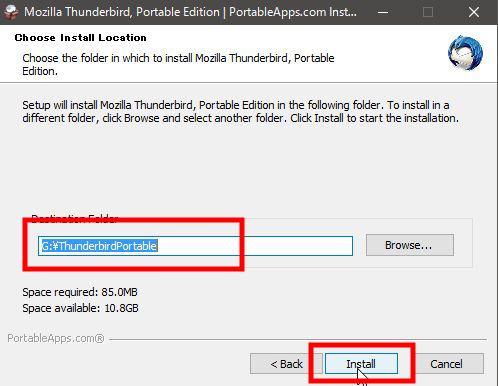
USBメモリにメールアプリを導入して持ち運ぶ方法5
この画面が表示されれば、USBメモリにThunderbird Portableが正常にインストールされているはずです。
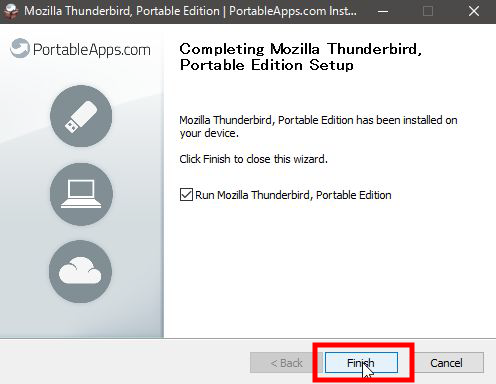
USBメモリにメールアプリを導入して持ち運ぶ方法6
Thunderbird Portableを起動したい時は、USBメモリにアクセスすると、新しく「Thunderbird Portable」をいうフォルダが生成されているので、その中にある「Thunderbird」をダブルクリックすればThunderbird Portableが起動します。
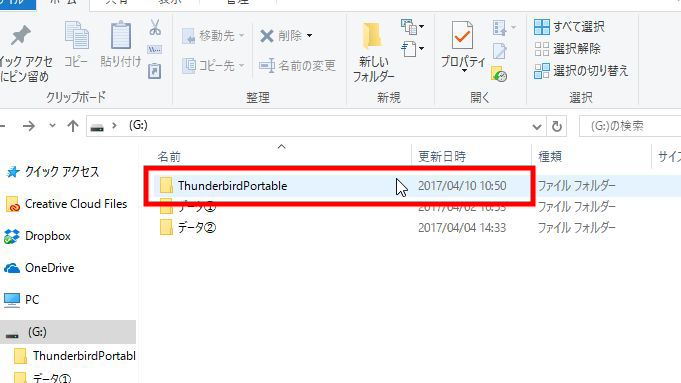
USBメモリにメールアプリを導入して持ち運ぶ方法7
2.まとめ
今回は、外部メディアから起動できる「Thunderbird Portable」のインストール方法を紹介してみました。
Thunderbird PortableをUSBメモリにインストールして普段使用しているフリーアドレスや、仕事で使うメールアドレスを設定しておけば、外出先等でもメールの送受信が可能になりますし、別のパソコンを使用してわざわざログインしなくても簡単にメールの送受信が出来ます。
またThunderbirdはメールが届くとパソコンの画面に通知してくれたりと、元々の機能が優れているのでメールアプリとしてとても優れているのでおすすめです。
興味がある人はインストールして普段から使用するメールアプリとして使用してみてはいかがでしょう。
Warning: include(/home/w-clue/howto-recordingmedia.com/public_html/wp-content/themes/cocoon-master/inc/single_under_ad.php): Failed to open stream: No such file or directory in /home/w-clue/howto-recordingmedia.com/public_html/wp-content/themes/cocoon-child-master/functions.php on line 15
Warning: include(): Failed opening '/home/w-clue/howto-recordingmedia.com/public_html/wp-content/themes/cocoon-master/inc/single_under_ad.php' for inclusion (include_path='.:/opt/php-8.1.34/data/pear') in /home/w-clue/howto-recordingmedia.com/public_html/wp-content/themes/cocoon-child-master/functions.php on line 15


コメント