もし今使っているUSBメモリが、今日紛失/盗難にあってしまった場合、バックアップは万全ですか?
以前紹介したUSBメモリに暗号化アプリをインストールしてセキュリティ強化はUSBメモリ内のデータを暗号化し、パスワードを知っている人にしかデータの閲覧が出来なくなる方法でした。
USBメモリを暗号化しておけば、万が一紛失/盗難が起こった場合に情報が流出してしまう事を防ぐことができますが、USBメモリ内のデータのバックアップを取っていなければ、大切なデータを全て失ってしまう事になります。
思い出の動画や写真、仕事で必要な資料等が入っていた場合、暗号化しているからいいか、とはならないはず。
今回紹介していくのは、万が一に備えてUSBメモリ内のデータを簡単にバックアップできるアプリケーション「BunBackup」のダウンロードからインストールまでを画像を用いて説明していきます。
Warning: include(/home/w-clue/howto-recordingmedia.com/public_html/wp-content/themes/cocoon-master/inc/single_top_ad.php): Failed to open stream: No such file or directory in /home/w-clue/howto-recordingmedia.com/public_html/wp-content/themes/cocoon-child-master/functions.php on line 15
Warning: include(): Failed opening '/home/w-clue/howto-recordingmedia.com/public_html/wp-content/themes/cocoon-master/inc/single_top_ad.php' for inclusion (include_path='.:/opt/php-8.1.32-2/data/pear') in /home/w-clue/howto-recordingmedia.com/public_html/wp-content/themes/cocoon-child-master/functions.php on line 15
1.BunBackupをダウンロードしよう
まずは「BunBackup」のインストーラーをダウンロードする為にBunBackupのダウンロードページにアクセスしましょう。
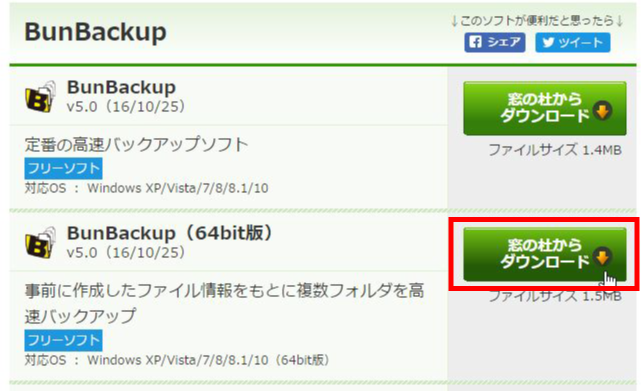
ダウンロードページにアクセスすると、下記画面が表示されるので「32bit版」か「64bit版」を選んでクリックします。
【USBメモリ】もしもの時の為に!アプリで簡単バックアップ1
クリックして少し待つとインストーラーがダウンロードされますので、USBメモリに保存しておきましょう。
2.BunBackupをインストールしよう
BunBackupのインストーラーが無事ダウンロードされたら「BunBackupS500.exe」をダブルクリックしてインストーラーを起動していきます。

【USBメモリ】もしもの時の為に!アプリで簡単バックアップ2
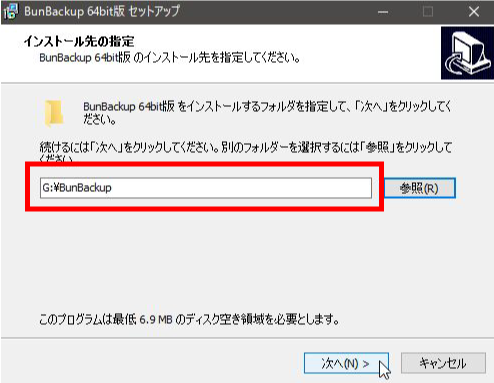
インストーラーが起動すると「インストール先の指定」が表示されるので「参照」ボタンを押しUSBメモリにインストール先を指定します。
【USBメモリ】もしもの時の為に!アプリで簡単バックアップ3
Warning: include(/home/w-clue/howto-recordingmedia.com/public_html/wp-content/themes/cocoon-master/inc/single_middle_ad.php): Failed to open stream: No such file or directory in /home/w-clue/howto-recordingmedia.com/public_html/wp-content/themes/cocoon-child-master/functions.php on line 15
Warning: include(): Failed opening '/home/w-clue/howto-recordingmedia.com/public_html/wp-content/themes/cocoon-master/inc/single_middle_ad.php' for inclusion (include_path='.:/opt/php-8.1.32-2/data/pear') in /home/w-clue/howto-recordingmedia.com/public_html/wp-content/themes/cocoon-child-master/functions.php on line 15
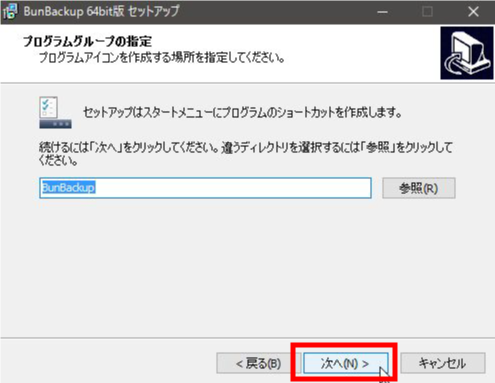
次に「プログラムグループの指定」ですが、これは特に理由がなければそのまま「次へ」をクリックします。ちなみにプログラムグループの指定とは、保存するファイル名の事ですので好きに設定しても構いません。
【USBメモリ】もしもの時の為に!アプリで簡単バックアップ4
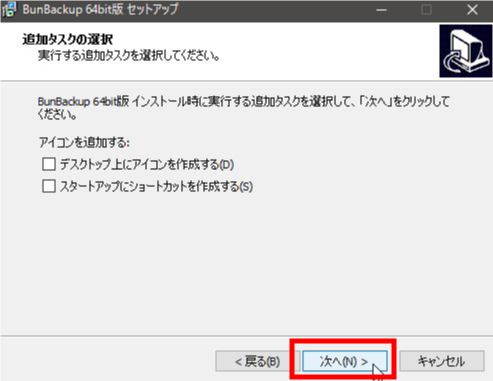
続いて「追加タスクの選択」になりますが、これもプログラムグループの指定と同じで特に必要なければそのまま「次へ」をクリックしましょう。
【USBメモリ】もしもの時の為に!アプリで簡単バックアップ5
設定の確認画面が表示されるのでそのままでよければ「インストールボタン」を押しましょう。
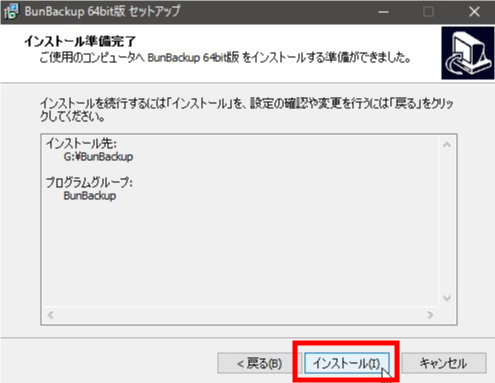
【USBメモリ】もしもの時の為に!アプリで簡単バックアップ6
追加タスクの選択が終わればインストールが開始され、正常にインストールが終わればBunBackupのインストールは終了です。
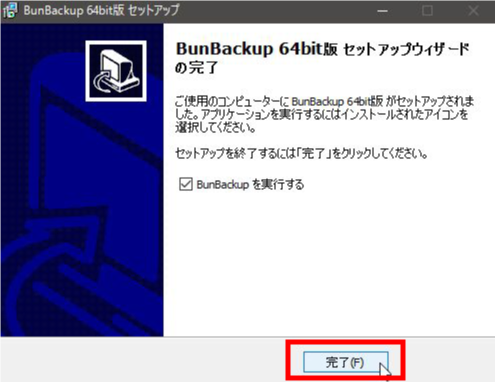
【USBメモリ】もしもの時の為に!アプリで簡単バックアップ7
【USBメモリ】もしもの時の為に!アプリで簡単バックアップまとめ
これでBunBackupをインストールする為の手順は終了となります。お疲れ様でした。
次回はBunBackupを使ったバックアップ設定方法と自動バックアップ方法について紹介していきたいと思います。
Warning: include(/home/w-clue/howto-recordingmedia.com/public_html/wp-content/themes/cocoon-master/inc/single_under_ad.php): Failed to open stream: No such file or directory in /home/w-clue/howto-recordingmedia.com/public_html/wp-content/themes/cocoon-child-master/functions.php on line 15
Warning: include(): Failed opening '/home/w-clue/howto-recordingmedia.com/public_html/wp-content/themes/cocoon-master/inc/single_under_ad.php' for inclusion (include_path='.:/opt/php-8.1.32-2/data/pear') in /home/w-clue/howto-recordingmedia.com/public_html/wp-content/themes/cocoon-child-master/functions.php on line 15



コメント