Warning: include(/home/w-clue/howto-recordingmedia.com/public_html/wp-content/themes/cocoon-master/inc/single_top_ad.php): Failed to open stream: No such file or directory in /home/w-clue/howto-recordingmedia.com/public_html/wp-content/themes/cocoon-child-master/functions.php on line 15
Warning: include(): Failed opening '/home/w-clue/howto-recordingmedia.com/public_html/wp-content/themes/cocoon-master/inc/single_top_ad.php' for inclusion (include_path='.:/opt/php-8.1.32-2/data/pear') in /home/w-clue/howto-recordingmedia.com/public_html/wp-content/themes/cocoon-child-master/functions.php on line 15
新しいパソコンを買ってみたもののどうやってメールを移行すれば?なんて困っていませんか?
受信メールに関してはサーバーにメールが残っている場合、移行せずとも再受信すれば問題はないですが、サーバーにメールを残していない場合や送信メールを移行したい場合は再受信ではだめですよね(;^ω^)
アドレス帳もどうすんだって感じですよね…
以前のパソコンを使い続けるのもいいですが、メールを見るだけで古いパソコンを見るのは不便です。
今回は簡単に出来るThunderbirdのデータ移行方法を紹介していきたいと思います。
1.Thunderbirdのデータ移行方法
最初にメールフォルダのバックアップを作成していきますので、Thunderbirdを立ち上げましょう。
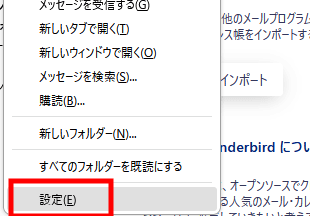
メールアカウントを選択し、右クリックしたら「設定」を選択します。

【仕事効率化】Thunderbirdのデータ移行方法!パソコンを買い替えた時どうする?1
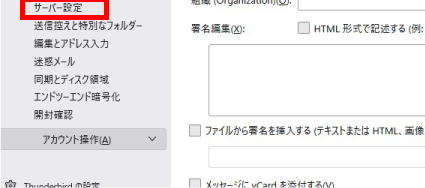
設定が開けたら次は「サーバー設定」を選択して開いたページを一番下まで行きます。

【仕事効率化】Thunderbirdのデータ移行方法!パソコンを買い替えた時どうする?2
一番下に「メッセージの保存」に関する項目がありますので「メッセージの保存先」にあるフォルダパスをコピーしてエクスプローラーでアクセスしましょう。
Warning: include(/home/w-clue/howto-recordingmedia.com/public_html/wp-content/themes/cocoon-master/inc/single_middle_ad.php): Failed to open stream: No such file or directory in /home/w-clue/howto-recordingmedia.com/public_html/wp-content/themes/cocoon-child-master/functions.php on line 15
Warning: include(): Failed opening '/home/w-clue/howto-recordingmedia.com/public_html/wp-content/themes/cocoon-master/inc/single_middle_ad.php' for inclusion (include_path='.:/opt/php-8.1.32-2/data/pear') in /home/w-clue/howto-recordingmedia.com/public_html/wp-content/themes/cocoon-child-master/functions.php on line 15

【仕事効率化】Thunderbirdのデータ移行方法!パソコンを買い替えた時どうする?3
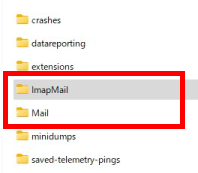
「.default」が付いているフォルダの中に「ImapMail」「Mail」この二つのフォルダがあるのでコピーします。

【仕事効率化】Thunderbirdのデータ移行方法!パソコンを買い替えた時どうする?4
コピーしたファイルを新しいThunderbirdの同じフォルダに上書きすればメールの移行は完了です!
ちなみにメール以外の設定やアドレス帳などを移行したい場合は「.default」フォルダの中身全てをコピーすれば全てが以降出来ますよ(‘ω’)
2.【仕事効率化】Thunderbirdのデータ移行方法!パソコンを買い替えた時どうする?まとめ
今回はパソコンを新しくした時に活用できるThunderbirdのデータ移行方法を紹介していきましたがいかがでしたか?
フォルダをコピーするだけで簡単に移行が出来るし、この方法で普段からフォルダのバックアップを作成しておけば突然パソコンが壊れてしまった場合でも安心ですね!
今回も最後までお読みいただきありがとうございました(‘ω’)b
Warning: include(/home/w-clue/howto-recordingmedia.com/public_html/wp-content/themes/cocoon-master/inc/single_under_ad.php): Failed to open stream: No such file or directory in /home/w-clue/howto-recordingmedia.com/public_html/wp-content/themes/cocoon-child-master/functions.php on line 15
Warning: include(): Failed opening '/home/w-clue/howto-recordingmedia.com/public_html/wp-content/themes/cocoon-master/inc/single_under_ad.php' for inclusion (include_path='.:/opt/php-8.1.32-2/data/pear') in /home/w-clue/howto-recordingmedia.com/public_html/wp-content/themes/cocoon-child-master/functions.php on line 15

コメント