
Gmailで登録した連絡先をThunderbirdでも使いたいと考えていませんか?
アドレス帳を同期することで、メール作成時に宛先を簡単に選択でき、作業効率を大きく向上させることができます。
この記事では、ThunderbirdとGmailのアドレス帳を同期する方法を初心者向けに分かりやすく解説します。
あわせて、同期できない場合の対処法も紹介していますので、参考にしてみてください。
Thunderbirdの設定方法をまとめて確認したい場合は、
「Thunderbird設定完全ガイド」もあわせてご覧ください。
Thunderbirdの設定・効率化・カスタマイズをまとめて解説しています。
ThunderbirdでGmailのアドレス帳を同期するメリット
- Gmailの連絡先をそのまま利用できる
- 宛先入力の手間を削減できる
- 複数デバイスで連絡先を共有できる
- メール作成がスムーズになる
1.ThunderbirdでGmailを同期させる
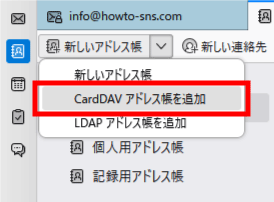
まずはThunderbirdを起動して左バーにある「アドレス帳」を選択するか「alt+2」を押しましょう。
アドレス帳のタブが開くので左上にある「新しいアドレス帳」の「↓」をクリックします。
すると「CardDAVアドレス帳を追加」がありますので選択します。
新しいCardDAVアドレス帳が開くので、そこに「ユーザー名」「場所」を入力していきます。
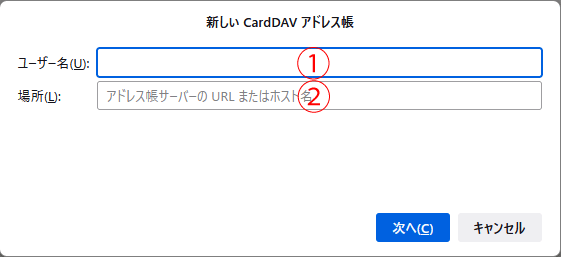
①同期させたいGmailのメールアドレスを入力します。
②「https://www.googleapis.com/carddav/v1/principals/<①で入力したアドレスの@より前の文字>/lists/default」を入力して「次へ」を押しましょう。
サンダーバードにGmailのメールアドレスを設定している場合認証画面は出ませんが、設定していない場合は認証画面が出ますのでログインして認証しておきましょう。
正しく入力が行えていれば利用可能なアドレス帳に「Address Book」が表示されますのでチェックを入れて次へを選択します。
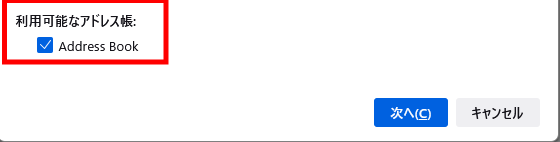
するとサンダーバードのアドレス帳にAddress Bookの項目が新しく表示されてGmailで登録していたアドレス帳が同期されています。
2.アドオンを使って同期させる
理由があって古いバージョンのThunderbirdを利用している人はアドオンを導入して同期しましょう。
Gmailのセキュリティ設定を確認する
まず、Gmailのセキュリティ設定を確認して、アプリやデバイスからのアクセスが許可されていることを確認してください。
Google アカウントのセキュリティ設定から「安全性の低いアプリの許可」を有効にする必要があります。
Thunderbirdを開く
Thunderbirdを開いて、画面上部のメニューバーから「ツール」を選択し、「アドオン」をクリックします。
アドオンマネージャーを開く
アドオンマネージャーが開いたら、検索バーに「Google Contacts」または「CardBook」と入力して、関連するアドオンを検索します。
アドオンをインストール
Google Contacts または CardBook といったGmailのアドレス帳を同期するためのアドオンを見つけたら、それをインストールします。
アドオンのインストール手順に従って、必要な権限を付与し、Thunderbirdを再起動します。
アドオンの設定
Thunderbirdが再起動したら、設定画面でアドオンの設定を行います。
Gmailのアカウント情報を入力し、同期の頻度や他の設定を調整できる場合があります。
アカウントの設定を完了したら、アドオンは自動的にGmailのアドレス帳と同期し始めます。
ThunderbirdでGmailのアドレス帳が同期されない場合の対処法
Thunderbirdでアドレス帳が同期されない場合は、以下を確認してください。
- Googleアカウントの認証が完了しているか
- CardDAV設定が正しく入力されているか
- インターネット接続が正常か
- Cookieやセキュリティ設定
特に認証エラーが原因になるケースが多いため、ログイン状態を確認しましょう。
よくある質問(FAQ)
ThunderbirdでGmailのアドレス帳を同期する際によくある質問をまとめました。
ThunderbirdでGmailのアドレス帳は同期できますか?
はい、ThunderbirdではCardDAVを利用することでGmailの連絡先を同期できます。アドレス帳として追加することで、自動的に同期されます。
Gmailの連絡先は自動で同期されますか?
はい、設定が正しく行われていれば自動で同期されます。手動で同期することも可能です。
アドレス帳が表示されない原因は?
主な原因は以下の通りです。
- Googleアカウントの認証ができていない
- CardDAV設定が間違っている
- 同期対象のアドレス帳が選択されていない
同期されない場合はどうすればいいですか?
以下を確認してみてください。
- Googleアカウントのログイン状態
- インターネット接続
- Cookieや認証設定
認証の問題が原因になることが多いです。
アドオンを使う必要はありますか?
最新版のThunderbirdではCardDAVで同期可能ですが、環境によっては「CardBook」などのアドオンを利用する方法もあります。
Gmailのラベルはどう表示されますか?
GmailのラベルはThunderbirdではアドレス帳やグループとして表示される場合があります。
まとめ
今回はGmailのアドレス帳をThunderbirdに同期させる方法を紹介していきましたがいかがでしたでしょうか。
一応アドオンを使った同期方法も紹介していますので、お好みで参考にしてみてくださいね!
ThunderbirdではGmailのアドレス帳を同期することで、連絡先管理を効率化でき、
設定を行うことで、メール作成時に宛先を簡単に選択できるようになり、
作業効率の向上につながります。
アカウント連携やその他の設定方法などは下記のリンクを参考にしてみてください。
- ThunderbirdでGoogleカレンダーを同期する方法
- Thunderbirdの設定方法まとめ|初心者でも失敗しない完全ガイド
- ThunderbirdでGmailを送受信する方法
- Thunderbirdで複数アカウントを追加する方法
- ThunderbirdでOutlookメールを受信する方法
今回も最後までお読みいただきありがとうございました(‘ω’)b
コメント