
フリーのメールソフトのMozilla ThunderbirdでMicrosoftアカウント(Outlook)のメールを受信したいと考えていませんか?
Thunderbirdを使えば、Outlookメールを含め複数のメールアカウントをまとめて管理することができます。
この記事では、ThunderbirdでMicrosoftアカウントのメールを受信する方法を初心者向けに分かりやすく解説します。
あわせて、設定できない場合の対処法についても紹介します。
Thunderbirdの設定方法をまとめて確認したい場合は、
「Thunderbird設定完全ガイド」もあわせてご覧ください。
Thunderbirdの設定・効率化・カスタマイズをまとめて解説しています。
ThunderbirdでMicrosoftメールを使うメリット
- Outlookメールをまとめて管理できる
- 複数アカウントを一元管理できる
- メールの確認や返信を効率化できる
- オフラインでもメールを確認できる
Microsoftアカウントを設定する方法
まずはThunderbirdを起動します。
起動したら「Altキー」を押してメニューを表示させましょう。
「ファイル」→「新規作成」→「既存のメールアカウント」を選択します。
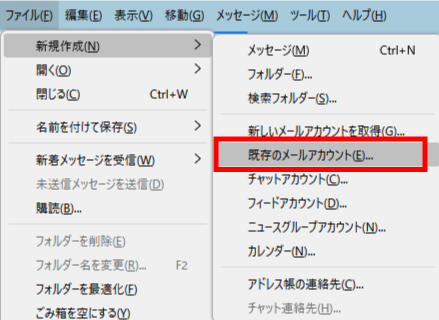
新しいメールアドレスを取得と勘違いする事が多いので注意です。
既存のメールアドレスのセットアップ画面が表示されますので
・あなたのお名前(任意)
・メールアドレス(Microsoftアカウント)
・パスワード(アカウントのパスワード)
の3つを入力していきましょう。
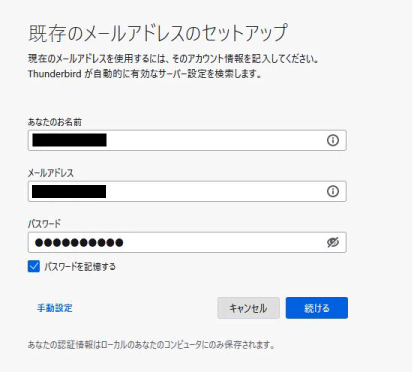
「パスワードを記憶する」にチェックを入れている方が後々楽ですが、それはあなたにお任せです。
入力が終われば「続ける」を押して次に進みます。
メールアドレスとパスワードが正しければ、thunderbirdが自動で設定を取得してくれるので、画像の様に「アカウント設定がMozilla ISPデータベースから見つかりました。」と表示されるまでしばらく待ちましょう。
メッセージが表示されない場合はメールアドレスかパスワードが間違っている可能性があるので、正しい情報を入力しましょう。
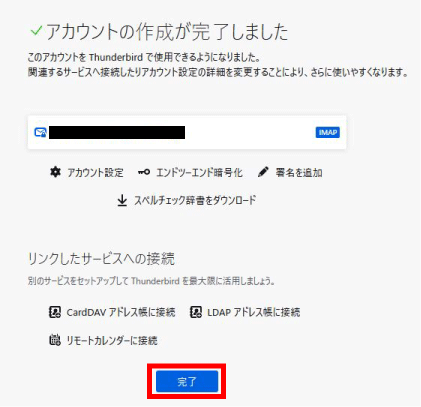
見つかりましたと表示されたら「完了」を押します。

完了を押せば「アカウントの作成が完了しました」と表示されますのでこれでMicrosoftアカウントでのメール受信が可能となりました。
再度表示されいている「完了」を選択する事で受信ボックスへ移動し、メールの受信を開始してくれます。
ThunderbirdでMicrosoftメールが受信できない場合の対処法
ThunderbirdでMicrosoftのメールが受信できない場合は、以下を確認してください。
- IMAPが有効になっているか
- メールアドレスやパスワードが正しいか
- サーバー設定が正しいか
- Microsoftアカウントの認証が完了しているか
特に認証エラーが原因になるケースが多いため、ログイン状態を確認しましょう。
よくある質問(FAQ)
ThunderbirdでMicrosoftアカウントのメールを受信する際によくある質問をまとめました。
ThunderbirdでOutlook(Microsoft)のメールは使えますか?
はい、ThunderbirdはOutlook.comやMicrosoftアカウントのメールに対応しており、設定することで送受信が可能です。
Microsoftアカウントの設定は自動でできますか?
はい、Thunderbirdではメールアドレスとパスワードを入力することで自動設定が行われる場合があります。
ThunderbirdでMicrosoftのメールが受信できない原因は?
主な原因は以下の通りです。
- IMAPが無効になっている
- サーバー設定が間違っている
- 認証エラー(Microsoftログイン)
ThunderbirdでMicrosoftのメールが送信できない原因は?
以下の原因が考えられます。
- SMTPサーバー設定の誤り
- ポート番号やSSL設定ミス
- 認証の問題
IMAPとPOPはどちらを使うべきですか?
複数端末でメールを同期する場合はIMAPがおすすめです。
1台のみで使用する場合はPOPも利用できます。
OutlookのメールはThunderbirdで同期されますか?
はい、IMAPを利用することでメールは同期されます。
別の端末でも同じメールを確認できます。
設定できない場合はどうすればいいですか?
以下を確認してください。
- メールアドレス・パスワードが正しいか
- サーバー設定が正しいか
- Microsoftアカウントの認証が完了しているか
2.まとめ
今回はthunderbirdを使ってMicrosoftアカウントのメールを受信する方法を紹介していきました。
「ファイル」→「新規作成」→「既存のメールアカウント」→「アカウントの情報の入力」を行えば簡単にセットアップが完了します。
Mozilla Thunderbirdはメジャーなフリーメールであれば自動で設定を行ってくれるのでとっても便利ですね!
アカウント連携やその他の設定方法などは下記のリンクを参考にしてみてください。
- ThunderbirdにGmailのアドレス帳を簡単に同期させる方法
- Thunderbirdの設定方法まとめ|初心者でも失敗しない完全ガイド
- ThunderbirdでGmailを送受信する方法
- ThunderbirdとGoogleカレンダーを同期する方法
- Thunderbirdで複数アカウントを追加する方法
今回も最後までお読みいただきありがとうございました。
コメント