
以前に【仕事効率化】Thunderbirdを使ってマイクロソフトアカウントでメールを受信する方法で紹介していますが、Thunderbird(サンダーバード)はメジャーなフリーメールなどであればアカウントのIDとパスワードだけで簡単にメールが受信できます。
近年、別のアカウントと連動してアプリにログインしたり、共有したりが当たり前になっている中、セキュリティー面での対策も問われるようになり、セキュリティー設定が原因でログインができなくなってしまうケースも増えてきています。
thunderbirdにログインできなくなってしまった場合はgoogle側の設定を見直す事で再度ログインが可能になります。
今回はGmailとthunderbirdのセキュリティー設定について紹介していきます。
Warning: include(/home/w-clue/howto-recordingmedia.com/public_html/wp-content/themes/cocoon-master/inc/single_top_ad.php): Failed to open stream: No such file or directory in /home/w-clue/howto-recordingmedia.com/public_html/wp-content/themes/cocoon-child-master/functions.php on line 15
Warning: include(): Failed opening '/home/w-clue/howto-recordingmedia.com/public_html/wp-content/themes/cocoon-master/inc/single_top_ad.php' for inclusion (include_path='.:/opt/php-8.1.34/data/pear') in /home/w-clue/howto-recordingmedia.com/public_html/wp-content/themes/cocoon-child-master/functions.php on line 15
1.ログインできなくなったらgoogle側を疑え
thunderbirdで設定したGmailのアカウントが受信できなくなってしまったらまずはGmailのセキュリティ設定を見直してみましょう。
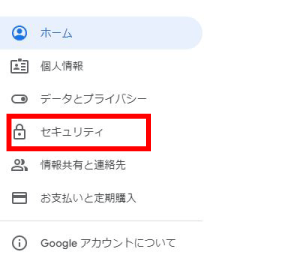
まずはgoogleのアカウントにログインし「アカウント管理」に進み、左にあるメニューから「セキュリティ」を選びます。
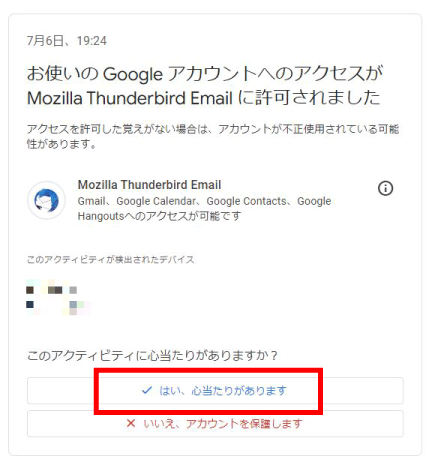
セキュリティ設定にある「最近のセキュリティ関連のアクティビティ」まで進み「Molilla thunderbird」の連携がどうなっているか確認しましょう。
↓画像のように「このアクティビティに心当たりがありますか?」と表示されていた場合、問題がなけれあば「はい、心当たりがあります」を選択しておきましょう。
これでgoogle側の設定は完了で、問題がなければthunderbirdでメールが受信できます。
Warning: include(/home/w-clue/howto-recordingmedia.com/public_html/wp-content/themes/cocoon-master/inc/single_middle_ad.php): Failed to open stream: No such file or directory in /home/w-clue/howto-recordingmedia.com/public_html/wp-content/themes/cocoon-child-master/functions.php on line 15
Warning: include(): Failed opening '/home/w-clue/howto-recordingmedia.com/public_html/wp-content/themes/cocoon-master/inc/single_middle_ad.php' for inclusion (include_path='.:/opt/php-8.1.34/data/pear') in /home/w-clue/howto-recordingmedia.com/public_html/wp-content/themes/cocoon-child-master/functions.php on line 15
2.google側の設定でもログインできない場合
1.のセキュリティ設定を見直してもログインできない場合はthunderbird側の設定も確認してみましょう。
thunderbirdを起動して「アカウント右クリック」→「設定」を選択。
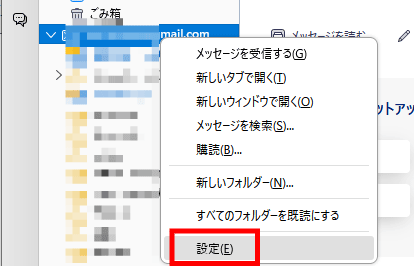
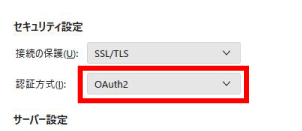
次に「サーバー設定」に進みます。
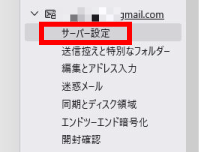
セキュリティ設定項目にある「認証方式」のプルダウンがどうなっているかを確認してください。画像の通りになっていない場合は「OAuth2」に設定しておきましょう。
OAuth2とは
OAuth(オーオース)ユーザーがサービスの認証を行う為のアクセストークンを発行する方式で、APIを取得する際に権限を確認する役割といった感じです。
詳しくはググってみてください(笑)
これでthunderbird側の設定は完了です。
3.ThunderbirdでGmailにログインできない!?場合の対処方法とはまとめ
今回はthunderbirdでGmailのアカウントが受信できなくなってしまった時の改善策を紹介していきましたがいかがでしたでしょうか。
基本的に受信に問題が出た場合はgoogle側の設定を確認してみましょう。
「アカウント管理」に進み、左にあるメニューから「セキュリティ」→「最近のセキュリティ関連のアクティビティ」→「Molilla thunderbird」連携確認→「このアクティビティに心当たりがありますか?」→「はい、心当たりがあります」
こんな感じです。もしそれでも改善しない場合はthunderbird側の
「アカウント右クリック」→「設定」→「サーバー設定」→「認証方式」を「OAuth2」です。
今回紹介した方法でログインができない場合はthunderbirdを一度再インストールした方がいいかもですね。
あと、googleアカウントのIDPWを変更したの忘れてませんか?
今回も最後までお読みいただきありがとうございました。
Warning: include(/home/w-clue/howto-recordingmedia.com/public_html/wp-content/themes/cocoon-master/inc/single_under_ad.php): Failed to open stream: No such file or directory in /home/w-clue/howto-recordingmedia.com/public_html/wp-content/themes/cocoon-child-master/functions.php on line 15
Warning: include(): Failed opening '/home/w-clue/howto-recordingmedia.com/public_html/wp-content/themes/cocoon-master/inc/single_under_ad.php' for inclusion (include_path='.:/opt/php-8.1.34/data/pear') in /home/w-clue/howto-recordingmedia.com/public_html/wp-content/themes/cocoon-child-master/functions.php on line 15
コメント