Warning: include(/home/w-clue/howto-recordingmedia.com/public_html/wp-content/themes/cocoon-master/inc/single_top_ad.php): Failed to open stream: No such file or directory in /home/w-clue/howto-recordingmedia.com/public_html/wp-content/themes/cocoon-child-master/functions.php on line 15
Warning: include(): Failed opening '/home/w-clue/howto-recordingmedia.com/public_html/wp-content/themes/cocoon-master/inc/single_top_ad.php' for inclusion (include_path='.:/opt/php-8.1.32-2/data/pear') in /home/w-clue/howto-recordingmedia.com/public_html/wp-content/themes/cocoon-child-master/functions.php on line 15
「Gmailで登録したメールアドレスをコピーして…Thunderbirdで新規作成で宛名にペーストして…うーん面倒だなぁ」なんて思いながら作業していませんか?
新しく登録した宛先や、Gmailでやり取りしていたけどサンダーバードでメールを作成したいなって時に毎回コピペしてメールを作るって面倒ですよね。
今回はGmailのアドレス帳を簡単にThunderbirdへ同期させる方法を紹介していきたいと思います。
1.ThunderbirdでGmailを同期させる
まずはThunderbirdを起動して左バーにある「アドレス帳」を選択するか「alt+2」を押しましょう。
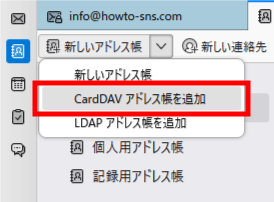
アドレス帳のタブが開くので左上にある「新しいアドレス帳」の「↓」をクリックします。
すると「CardDAVアドレス帳を追加」がありますので選択します。

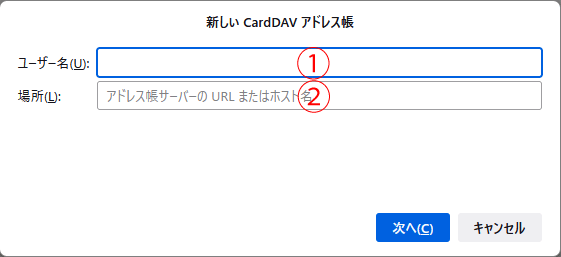
新しいCardDAVアドレス帳が開くので、そこに「ユーザー名」「場所」を入力していきます。

①同期させたいGmailのメールアドレスを入力します。
②「https://www.googleapis.com/carddav/v1/principals/<①で入力したアドレスの@より前の文字>/lists/default」を入力して「次へ」を押しましょう。
サンダーバードにGmailのメールアドレスを設定している場合認証画面は出ませんが、設定していない場合は認証画面が出ますのでログインして認証しておきましょう。
正しく入力が行えていれば利用可能なアドレス帳に「Address Book」が表示されますのでチェックを入れて次へを選択します。

するとサンダーバードのアドレス帳にAddress Bookの項目が新しく表示されてGmailで登録していたアドレス帳が同期されています。
Warning: include(/home/w-clue/howto-recordingmedia.com/public_html/wp-content/themes/cocoon-master/inc/single_middle_ad.php): Failed to open stream: No such file or directory in /home/w-clue/howto-recordingmedia.com/public_html/wp-content/themes/cocoon-child-master/functions.php on line 15
Warning: include(): Failed opening '/home/w-clue/howto-recordingmedia.com/public_html/wp-content/themes/cocoon-master/inc/single_middle_ad.php' for inclusion (include_path='.:/opt/php-8.1.32-2/data/pear') in /home/w-clue/howto-recordingmedia.com/public_html/wp-content/themes/cocoon-child-master/functions.php on line 15
2.アドオンを使って同期させる
理由があって古いバージョンのThunderbirdを利用している人はアドオンを導入して同期しましょう。
Gmailのセキュリティ設定を確認する
まず、Gmailのセキュリティ設定を確認して、アプリやデバイスからのアクセスが許可されていることを確認してください。
Google アカウントのセキュリティ設定から「安全性の低いアプリの許可」を有効にする必要があります。
Thunderbirdを開く
Thunderbirdを開いて、画面上部のメニューバーから「ツール」を選択し、「アドオン」をクリックします。
アドオンマネージャーを開く
アドオンマネージャーが開いたら、検索バーに「Google Contacts」または「CardBook」と入力して、関連するアドオンを検索します。
アドオンをインストール
Google Contacts または CardBook といったGmailのアドレス帳を同期するためのアドオンを見つけたら、それをインストールします。
アドオンのインストール手順に従って、必要な権限を付与し、Thunderbirdを再起動します。
アドオンの設定
Thunderbirdが再起動したら、設定画面でアドオンの設定を行います。
Gmailのアカウント情報を入力し、同期の頻度や他の設定を調整できる場合があります。
アカウントの設定を完了したら、アドオンは自動的にGmailのアドレス帳と同期し始めます。
【仕事効率化】ThunderbirdにGmailのアドレス帳を簡単に同期させる方法まとめ
今回はGmailのアドレス帳をThunderbirdに同期させる方法を紹介していきましたがいかがでしたでしょうか。
一応アドオンを使った同期方法も紹介していますので、お好みで参考にしてみてくださいね!
今回も最後までお読みいただきありがとうございました(‘ω’)b
Warning: include(/home/w-clue/howto-recordingmedia.com/public_html/wp-content/themes/cocoon-master/inc/single_under_ad.php): Failed to open stream: No such file or directory in /home/w-clue/howto-recordingmedia.com/public_html/wp-content/themes/cocoon-child-master/functions.php on line 15
Warning: include(): Failed opening '/home/w-clue/howto-recordingmedia.com/public_html/wp-content/themes/cocoon-master/inc/single_under_ad.php' for inclusion (include_path='.:/opt/php-8.1.32-2/data/pear') in /home/w-clue/howto-recordingmedia.com/public_html/wp-content/themes/cocoon-child-master/functions.php on line 15

コメント