せっかくUSBメモリにThunderbirdをインストールし、外出先でもメールの送受信が可能になったのに、設定をしていなければThunderbirdを使う事も出来ません。
設定方法がよくわからないというあなたの為に今回はUSBメモリにメールアプリを導入して持ち運ぶ方法で紹介した「Thunderbird」の初期設定方法を紹介します。
Warning: include(/home/w-clue/howto-recordingmedia.com/public_html/wp-content/themes/cocoon-master/inc/single_top_ad.php): Failed to open stream: No such file or directory in /home/w-clue/howto-recordingmedia.com/public_html/wp-content/themes/cocoon-child-master/functions.php on line 15
Warning: include(): Failed opening '/home/w-clue/howto-recordingmedia.com/public_html/wp-content/themes/cocoon-master/inc/single_top_ad.php' for inclusion (include_path='.:/opt/php-8.1.34/data/pear') in /home/w-clue/howto-recordingmedia.com/public_html/wp-content/themes/cocoon-child-master/functions.php on line 15
1.メールアカウントを設定しましょう
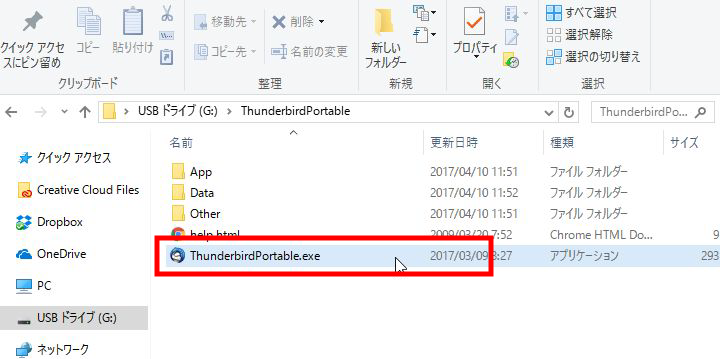
まずはUSBメモリをパソコンに接続して使ってみようで紹介した方法でUSBメモリにアクセスし、トップのフォルダを開いておきましょう。
インストール時に新しく作成されたフォルダThunderbird Portableをクリックし「Thunderbird Portable」を起動しましょう。
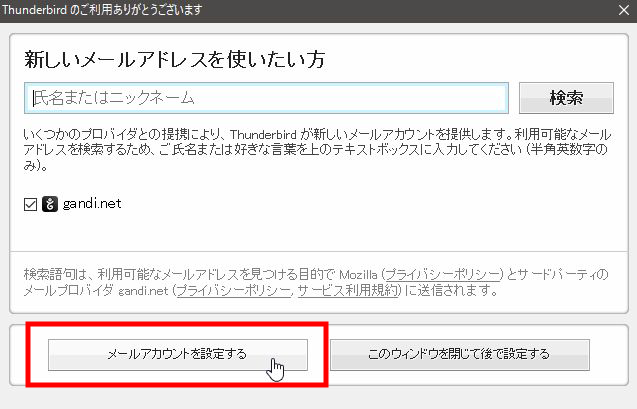
USBメモリにインストールしたThunderbirdの設定方法1
メール設定が行われていない場合にThunderbirdを起動すればメールアドレスの設定画面が表示されるので赤枠の「メールアカウントを設定する」をクリックしましょう。
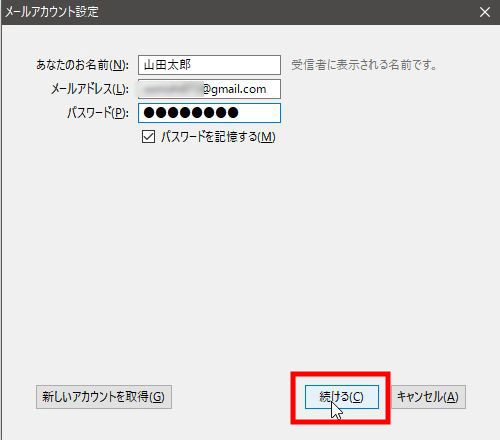
USBメモリにインストールしたThunderbirdの設定方法2
メールアカウントを設定するをクリックすると「名前」「メールアドレス」「パスワード」の入力を求められますので設定したいメールアドレスの情報を入力し「続ける」をクリックします。
※今回私はGmailを使用して設定を行っています。
USBメモリにインストールしたThunderbirdの設定方法3
正しくメールアドレス・パスワードがの入力が行われていれば、完了画面が表示され、自動でメールの同期が始まります。
今回設定したメールアドレスを長い期間使用し、たくさんのメールを受信している場合は同期完了まで少し時間がかかりますので、同期が完了するまで待ちましょう。
Warning: include(/home/w-clue/howto-recordingmedia.com/public_html/wp-content/themes/cocoon-master/inc/single_middle_ad.php): Failed to open stream: No such file or directory in /home/w-clue/howto-recordingmedia.com/public_html/wp-content/themes/cocoon-child-master/functions.php on line 15
Warning: include(): Failed opening '/home/w-clue/howto-recordingmedia.com/public_html/wp-content/themes/cocoon-master/inc/single_middle_ad.php' for inclusion (include_path='.:/opt/php-8.1.34/data/pear') in /home/w-clue/howto-recordingmedia.com/public_html/wp-content/themes/cocoon-child-master/functions.php on line 15
フリーアドレス以外を設定する方法
今回はGmailでメールアドレスの設定を行いましたが、会社のメール等、フリーアドレスでない場合は個別の設定が必要になる場合があります。その場合は下記画像の「手動設定」から設定するメールアドレスの詳細を入力し設定を行ってください。
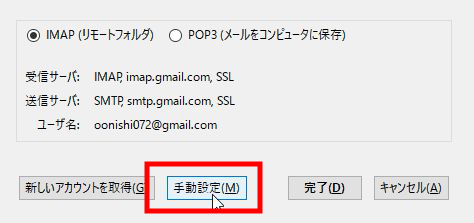
USBメモリにインストールしたThunderbirdの設定方法4
2.USBメモリにインストールしたThunderbirdの初期設定方法まとめ
今回はUSBメモリにメールアプリを導入して持ち運ぶ方法で紹介したThunderbird Portableの初期設定方法を紹介しました。
メールアドレスの設定を行っていなければ、USBメモリにThunderbird Portableを導入した意味がないので、インストールした場合はすぐに設定を行いましょう。
また、Thunderbirdが英語表記で使いにくいという人はThunderbirdを日本語化してメールの送受信を行いたいを参考に日本語化を行ってみてくださいね。
Warning: include(/home/w-clue/howto-recordingmedia.com/public_html/wp-content/themes/cocoon-master/inc/single_under_ad.php): Failed to open stream: No such file or directory in /home/w-clue/howto-recordingmedia.com/public_html/wp-content/themes/cocoon-child-master/functions.php on line 15
Warning: include(): Failed opening '/home/w-clue/howto-recordingmedia.com/public_html/wp-content/themes/cocoon-master/inc/single_under_ad.php' for inclusion (include_path='.:/opt/php-8.1.34/data/pear') in /home/w-clue/howto-recordingmedia.com/public_html/wp-content/themes/cocoon-child-master/functions.php on line 15


コメント