今回はUSBメモリに展開・圧縮ファイルをインストールして持ち運ぶ方法でダウンロード&インストールしている「7-Zip Portable」を使った「解凍/圧縮」方法を紹介します。
7-Zip Portableでは
圧縮形式:「7z」「ZIP」「GZIP」「BZIP2」「TAR」
解凍形式:「RAR」「CAB」「ISO」「ARJ」「LZH」「CHM」「Z」「CPIO」「RPM」「NSIS」
といったかなりの数の形式に対応しているので、USBメモリにインストールしてどこでも解凍/圧縮が出来るととても便利ですね。
7-Zip Portableはインストールしたばかりの状態では日本語化もしていないと思いますので、日本語化する方法も同時に紹介していきます。
Warning: include(/home/w-clue/howto-recordingmedia.com/public_html/wp-content/themes/cocoon-master/inc/single_top_ad.php): Failed to open stream: No such file or directory in /home/w-clue/howto-recordingmedia.com/public_html/wp-content/themes/cocoon-child-master/functions.php on line 15
Warning: include(): Failed opening '/home/w-clue/howto-recordingmedia.com/public_html/wp-content/themes/cocoon-master/inc/single_top_ad.php' for inclusion (include_path='.:/opt/php-8.1.32-2/data/pear') in /home/w-clue/howto-recordingmedia.com/public_html/wp-content/themes/cocoon-child-master/functions.php on line 15
1.7-Zip Portableを日本語化しよう
まずUSBメモリにインストールしている7-Zip Portableを起動します。7-Zip Portableのインストールがまだの人はUSBメモリに展開・圧縮ファイルをインストールして持ち運ぶ方法を参考にインストールしておいてください。
「7-Zip Portable」→「7-ZipPortable.exe」をダブルクリックして起動します。

USBメモリに導入した7-Zip Portableで解凍/圧縮をする方法1
初回起動すると言語は英語になっているので上のメニューの「ツール」→「オプション」を選択します。
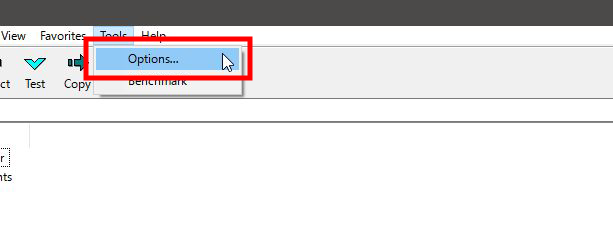
USBメモリに導入した7-Zip Portableで解凍/圧縮をする方法3
オプションが開くと、タブメニューの「language」タブを選択して言語を英語から日本語に変更して「適応」→「OK」のクリックで言語が日本語に変更されます。
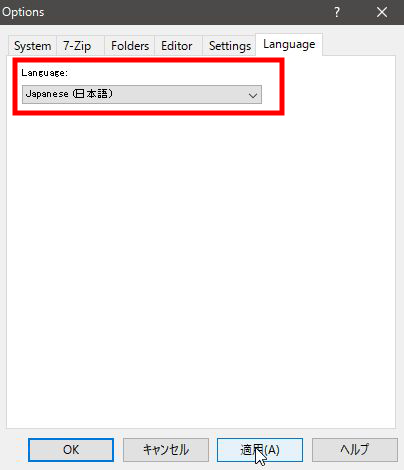
USBメモリに導入した7-Zip Portableで解凍/圧縮をする方法4
Warning: include(/home/w-clue/howto-recordingmedia.com/public_html/wp-content/themes/cocoon-master/inc/single_middle_ad.php): Failed to open stream: No such file or directory in /home/w-clue/howto-recordingmedia.com/public_html/wp-content/themes/cocoon-child-master/functions.php on line 15
Warning: include(): Failed opening '/home/w-clue/howto-recordingmedia.com/public_html/wp-content/themes/cocoon-master/inc/single_middle_ad.php' for inclusion (include_path='.:/opt/php-8.1.32-2/data/pear') in /home/w-clue/howto-recordingmedia.com/public_html/wp-content/themes/cocoon-child-master/functions.php on line 15
2.7-Zip Portableで圧縮ファイルを解凍しよう
続いて7-Zip Portableを使った圧縮ファイルの解凍・展開方法です。
展開したいファイルのフォルダにアクセスして、展開したいファイルを選択したまま、メニューの「展開」ボタンを押します。
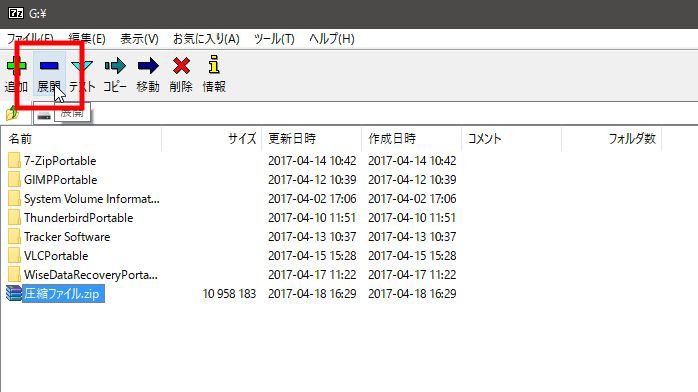
USBメモリに導入した7-Zip Portableで解凍/圧縮をする方法5
展開メニューが開くので、どこに展開したいのかを選択してOKボタンを押せば任意の場所に圧縮ファイルを解凍する事が出来ます。
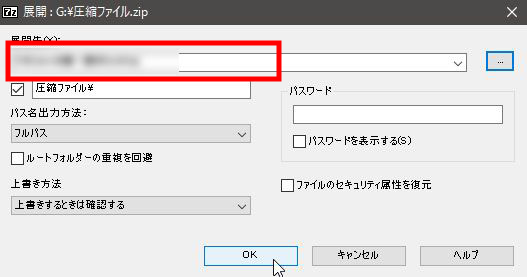
USBメモリに導入した7-Zip Portableで解凍/圧縮をする方法6
3.7-Zip Portableでファイルを圧縮しよう
次は②と逆でファイルを圧縮する方法です。
①で紹介した方法で7-Zip Portableを起動し、起動したアプリに圧縮したいファイルをドラッグ&ドロップしていきます。
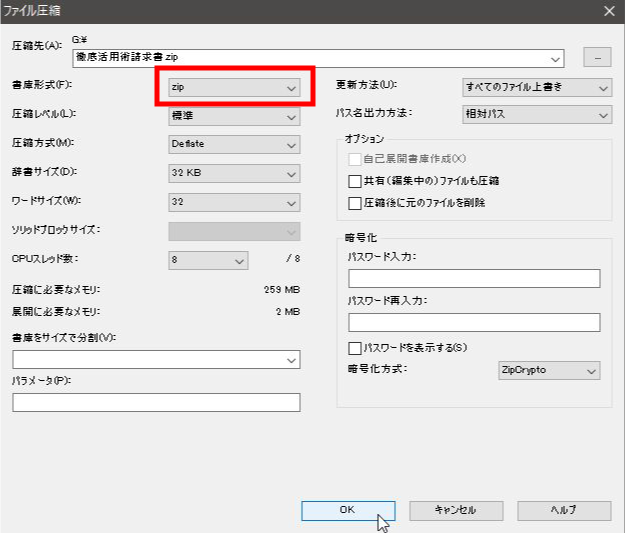
ドラッグ&ドロップが正常に行われれば、圧縮メニューが開くので任意の設定に変更しましょう。今回は圧縮形式をZIPに選択しています。
USBメモリに導入した7-Zip Portableで解凍/圧縮をする方法7
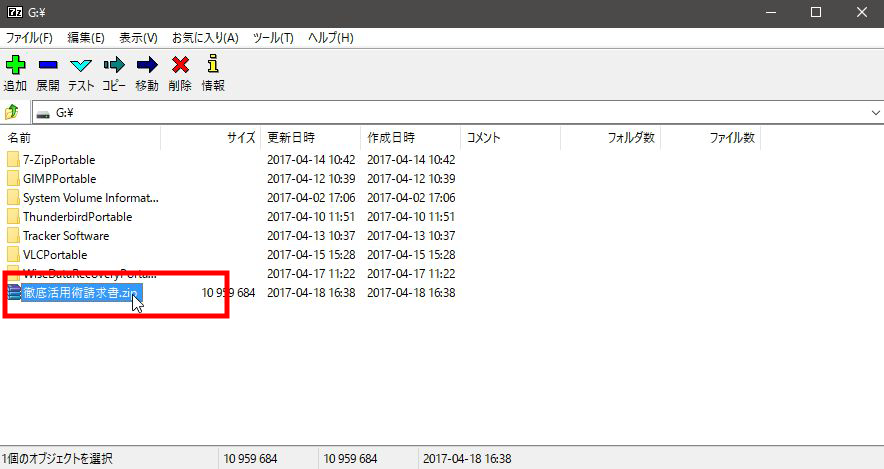
また、暗号化させたい場合は「パスワード」にパスワードを設定しておけば、展開時にパスワードが求められるようになりますので、パスワードを知らない人には開けない圧縮ファイルとなります。
USBメモリに導入した7-Zip Portableで解凍/圧縮をする方法8
USBメモリに導入した7-Zip Portableで解凍/圧縮をする方法まとめ
今回はUSBメモリに展開・圧縮ファイルをインストールして持ち運ぶ方法で紹介した7-Zip Portableの使い方を紹介しましたがいかがだったでしょうか。
外出先のパソコンで解凍できないファイルなどがあった場合困る事もかるかもしれませんので、小型で持ち運びが可能なUSBメモリに展開/圧縮が可能な7-Zip Portableをインストールしておけばいつでも安心ですね。
7-Zip Portableのダウンロード&インストール方法はUSBメモリに展開・圧縮ファイルをインストールして持ち運ぶ方法を参考にどうぞ。
Warning: include(/home/w-clue/howto-recordingmedia.com/public_html/wp-content/themes/cocoon-master/inc/single_under_ad.php): Failed to open stream: No such file or directory in /home/w-clue/howto-recordingmedia.com/public_html/wp-content/themes/cocoon-child-master/functions.php on line 15
Warning: include(): Failed opening '/home/w-clue/howto-recordingmedia.com/public_html/wp-content/themes/cocoon-master/inc/single_under_ad.php' for inclusion (include_path='.:/opt/php-8.1.32-2/data/pear') in /home/w-clue/howto-recordingmedia.com/public_html/wp-content/themes/cocoon-child-master/functions.php on line 15


コメント