
外出先でも自宅と同じWEBブラウザを使用する方法やUSBメモリにメールアプリを導入して持ち運ぶ方法でウェブブラウザやメールアプリをUSBメモリにインストールして持ち運ぶ方法を紹介してきましたが、今回は画像を加工するアプリケーション「GIMP Portable」の導入方法を紹介します。
外出先や出張先で急遽プレゼンを行う資料を作成したり編集したりという事があった場合、USBメモリに画像加工可能なアプリケーションを導入しておけば、どこでも資料の編集を行う事が出来るでしょう。
USBメモリに画像加工アプリをインストールしておけば、外出先で突然の変更があった場合でも安心ですよね。
Warning: include(/home/w-clue/howto-recordingmedia.com/public_html/wp-content/themes/cocoon-master/inc/single_top_ad.php): Failed to open stream: No such file or directory in /home/w-clue/howto-recordingmedia.com/public_html/wp-content/themes/cocoon-child-master/functions.php on line 15
Warning: include(): Failed opening '/home/w-clue/howto-recordingmedia.com/public_html/wp-content/themes/cocoon-master/inc/single_top_ad.php' for inclusion (include_path='.:/opt/php-8.1.32-2/data/pear') in /home/w-clue/howto-recordingmedia.com/public_html/wp-content/themes/cocoon-child-master/functions.php on line 15
1.GIMP Portableをダウンロードしよう
まずはGIMP Portableのダウンロードページから「GIMP Portable」をダウンロードしましょう。赤枠の部分をクリックするとダウンロードが開始されます。
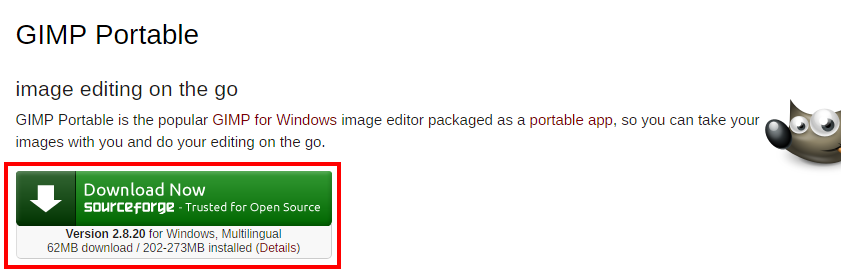
USBメモリに画像加工アプリを導入して持ち運ぶ方法1
ダウンロード先はUSBメモリを選択しておきます。
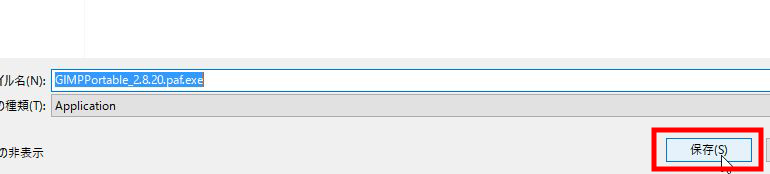
USBメモリに画像加工アプリを導入して持ち運ぶ方法2
Warning: include(/home/w-clue/howto-recordingmedia.com/public_html/wp-content/themes/cocoon-master/inc/single_middle_ad.php): Failed to open stream: No such file or directory in /home/w-clue/howto-recordingmedia.com/public_html/wp-content/themes/cocoon-child-master/functions.php on line 15
Warning: include(): Failed opening '/home/w-clue/howto-recordingmedia.com/public_html/wp-content/themes/cocoon-master/inc/single_middle_ad.php' for inclusion (include_path='.:/opt/php-8.1.32-2/data/pear') in /home/w-clue/howto-recordingmedia.com/public_html/wp-content/themes/cocoon-child-master/functions.php on line 15
2.GIMP Portableをインストールしよう
ダウンロードが完了したら、USBメモリに保存したGIMPの「exeファイル」をダブルクリックします。
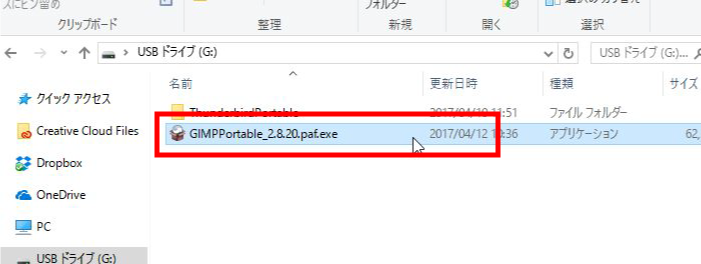
USBメモリに画像加工アプリを導入して持ち運ぶ方法3
使用言語の選択画面が表示されるので「日本語」を選択します。
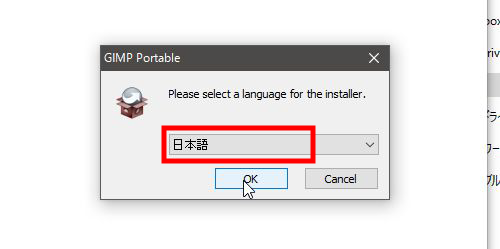
USBメモリに画像加工アプリを導入して持ち運ぶ方法4
言語選択後、インストールを開始してもいいかと聞かれるので「次へ」をクリック
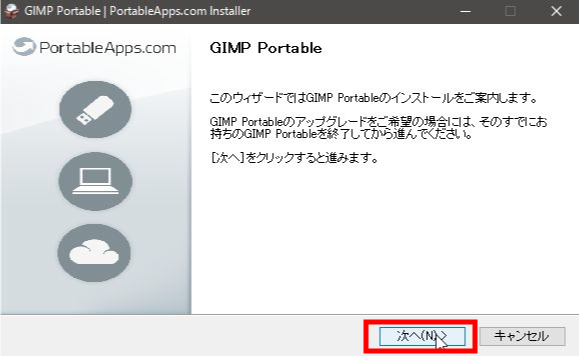
USBメモリに画像加工アプリを導入して持ち運ぶ方法5
続いてコンポーネントの選択画面になりますが、初期値のままだと別のソフトがインストールされてしまうので赤枠のチェックを外し「次へ」をクリックしましょう。
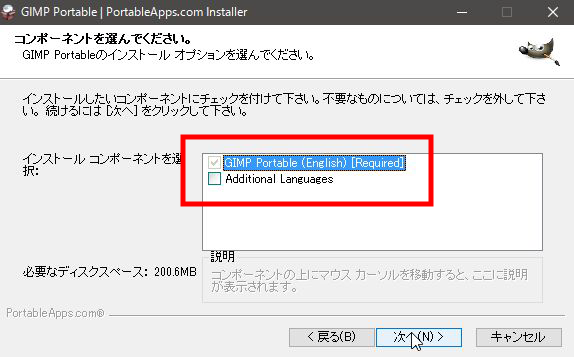
USBメモリに画像加工アプリを導入して持ち運ぶ方法6
次はGIMP Portableをどこにインストールするかを設定する画面が表示されます。exeファイルをUSBメモリにダウンロードしておけば、自動的にインストール先はUSBメモリになっているのでそのまま「インストール」を押します。
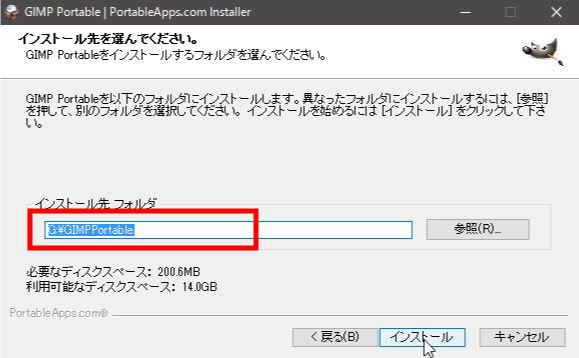
USBメモリに画像加工アプリを導入して持ち運ぶ方法7
初期値でUSBメモリが選択されていない場合は「参照」を選択し、インストール先をUSBメモリに指定しておきましょう。
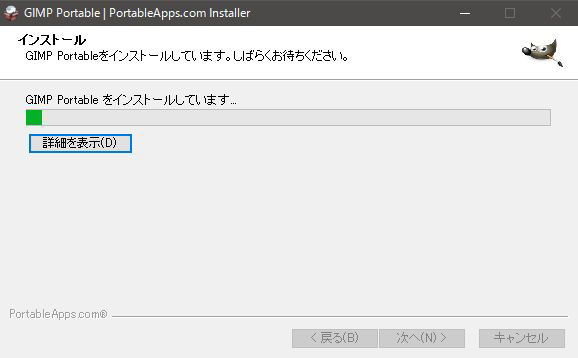
インストールを押せばインストールの開始です。少し時間がかかる場合がありますので気長に待ちましょう。
USBメモリに画像加工アプリを導入して持ち運ぶ方法8
下記画像が表示されればインストールは完了です。「完了」を押してインストールを終了しましょう。
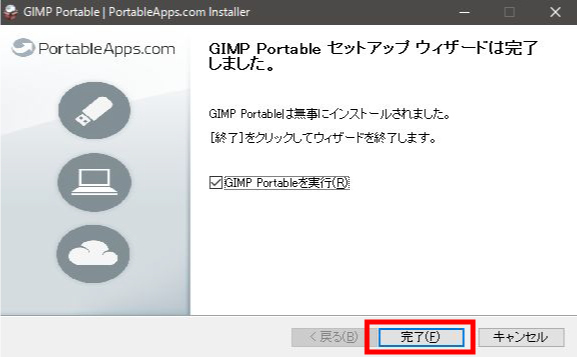
USBメモリに画像加工アプリを導入して持ち運ぶ方法9
USBメモリに画像加工アプリを導入して持ち運ぶ方法まとめ
ダウンロードからインストールまでは、以前紹介している自宅と同じウェブブラウザを外出先でも使用する方法と違いはないので、ブラウザやメールアプリをUSBメモリにインストールした事がある場合は簡単にGIMP Portableの導入が出来るかと思います。
普段そんなに画像加工をしたりしない人でも、突然の資料編集等が必要になった場合の為にGIMP PortableをインストールしてUSBメモリで持ち運んでいれば安心ではないでしょうか。
Warning: include(/home/w-clue/howto-recordingmedia.com/public_html/wp-content/themes/cocoon-master/inc/single_under_ad.php): Failed to open stream: No such file or directory in /home/w-clue/howto-recordingmedia.com/public_html/wp-content/themes/cocoon-child-master/functions.php on line 15
Warning: include(): Failed opening '/home/w-clue/howto-recordingmedia.com/public_html/wp-content/themes/cocoon-master/inc/single_under_ad.php' for inclusion (include_path='.:/opt/php-8.1.32-2/data/pear') in /home/w-clue/howto-recordingmedia.com/public_html/wp-content/themes/cocoon-child-master/functions.php on line 15

コメント